WebHare for development
This manual will explain how to setup a local WebHare installation for development and will guide you through building a website. We will be using Docker to manage the WebHare installation. This guide assumes you’re using an up-to-date operating system, and if using Windows, at minimum Windows 10 Professional.
If you have sufficient experience manually maintaining and compiling software, you can alternatively install WebHare from source.
Installing WebHare
First, install Docker from https://www.docker.com/get-started.
On Windows
First, a folder is needed where all data will be stored. Run the following command to create it:
mkdir "%USERPROFILE%/whdata"
To start WebHare, run the following command:
docker run -ti --rm --name webhare -p 80:80 -p 443:443 -v %USERPROFILE%/whdata:/opt/whdata --tmpfs /opt/whdata/tmp/ webhare/platform:master
If Docker asks you whether you want to share your C: drive, you should probably do so.
If you run into std::bad_alloc errors, verify the commandline - you may be running into issues with temporary files being created on NTFS (which doesn’t support unlinking the files after creation and then mmap()ing them)
On macOS or Linux
First, a folder is needed where all data will be stored. Run the following command to create it (you only need to do this once):
mkdir ~/whdata
To start WebHare, run the following command:
docker run -ti --rm --name webhare -p 80:80 -p 443:443 -v ~/whdata:/opt/whdata webhare/platform:master
You’ll see something similar to the following screen if WebHare started correctly:
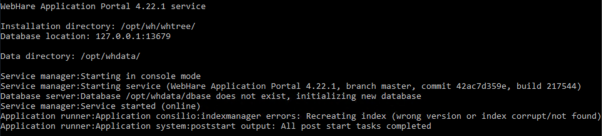
WebHare ships with a command line interface named ‘wh’. We can use docker to invoke this tool for us. One use is to check WebHare’s status. Let’s see if everything is working correctly:
docker exec webhare wh check
You will see something like:

It’s running, but we cannot connect to it yet . We need to be able to access what we often simply call the ‘backend’ - the WebHare backend interface.
Setting up the Webhare backend interface
On a production server we would generally setup a proxy server to host the interface, but here we’ll let the built-in webserver handle it by itself. We need an open port for virtual hosting so we can run multiple websites on the same port (in our case: the WebHare backend and a future output website).
To create a virtual hosted port on port 80 and host a site named ‘localhost’ on it, and create a sysop account for yourself - preferably with a different password:
docker exec webhare wh webserver addport --virtual 80
docker exec webhare wh webserver addbackend http://localhost/
docker exec webhare wh users adduser --sysop --password secret sysop@example.net
First login
Visit the URL you’ve just added - eg http://localhost/ and login and password specified above.
At the bottom right of the screen you will most likely have two messages - one warning to inform you of unresolved issues and one question to ask for desktop notifications. If you click this message your browser will ask you for permission to display notifications as browser notifications from now on.
Setting up output
To configure output an Output webserver must be added. This can be done from the Webservers application:
- Start the Webservers application from the WebHare start menu.
- Click the "Add" button and choose "Webserver".
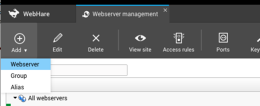
- The "Edit webserver" screen is opened.

- Choose the appropriate settings
- Server type: Webhare output server
- Binding type; usually this is "Name-based hosting", where the URL domain name is used to look up the corresponding webserver.
- For local development, http://127.0.0.1/ can be used.
- Click “OK” to save the webserver.