Changing layout
To edit the site template, goto your webhare data folder. You can find the files for the site layout in whdata/installedmodules/<modulename>/webdesigns/<webdesignname>/.
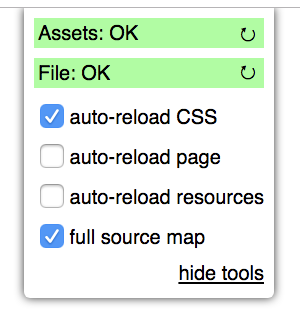
You can change the webdesign files described below to change the page. When making changes to the files you may need to use the ‘refresh’ action (![]() ) for the assets to see the changes.
) for the assets to see the changes.
Javascript file
<webdesignname>.es is main javascript file. You need to import all other needed javascript and (s)css files in this file.
CSS/SASS file
<webdesignname>.scss is the CSS / Sass file for styling.
Site profile
<webdesignname>.siteprl.xml - the site profile for the website. More information about this file can be found in the references.
Inline images in the RTD files are set to a maximum width which is defined the attribute ‘maxcontentwidth’ in the ‘webdesign’ node.
The site language can be found in the siteprofile in element ‘sitelanguage’.
You can activate statistics from Google by using/activating one of the settings in the siteprofile:
    <googleanalytics account="UA-XXXXXXX-X" />
    <gtm account="GTM-XXXXXX" />
When using googleanalytics, by default ‘anonymizeip’ is enabled.
HareScript library
<webdesignname>.whlib - more about the HareScript library can be found in the references.
Witty Template
<webdesignname>.witty - more about the Witty template can be found in the references.
RTD Styling
/shared/rtd/rtd.css - You can find basic styling for RTD content in ‘/shared/rtd/rtd.css’
If you want to use a custom font, add at top the rtd.css file the import rule like:
@import url(//fonts.googleapis.com/css?family=Open+Sans:400,700,400i,700i);
RTD-related JavaScript
/shared/rtd/rtd.es
RTD apply rules
/shared/rtd/rtd.siteprl.xml - XML apply rules for RTD documents.
Webdesign image folder
Folder <webdesignname>/web/img/
There is a <webdesignname>/‘web/img/’ folder where you can put all static images used in the template. These images are accessible in the template by using [imgroot]<imagefilename>.
The “htmlhead” component
The main witty template contains two required components, a htmlhead component and a htmlbody component.
The htmlhead is used for elements inside the head-element of the rendered page.
You can add additional meta tags inside the htmlhead component like meta tags for the site icons.
Some basic elements and links to the compiled javascript and css for the webdesign are automatically generated added to the head-element.
Opengraph meta is automatically added to the head-element if Opengraph plugin settings are present in the siteprofile and applied to the rendered page.
To add the opengraph plugin add next to siteprofile within the part for apply rule all:
  <opengraph xmlns="http://www.webhare.net/xmlns/socialite"
             site_name="WebHare - Examplesite"
             type="website"
             image="web/img/logo-big.png"
             />
A robots meta-tag (like ‘<meta name="robots" content="noindex">’) is automatically placed inside the head-element if robots plugin settings are applied to the current page in the siteprofile.
<robots xmlns="http://www.webhare.net/xmlns/consilio"/>
Changes are only visible in the output html after republishing the whole site.
The “htmlbody” component
The htmlbody is used for elements inside the body-element. Usually, this is used to render the page header, navigation and footer of pages (elements that are present on every page of the site).
It should at least have the macro [contents] which is used to render the actual contents of a page (as rendered by rich documents, forms, prebuilt pages, etc.).
Adding navigation
To add navigation to the template you first need to edit the Harescript library <webdesignname>.whlib in your editor. Inside this file you find a public objecttype <webdesignname>Design.
In this objecttype you can find (initially commented out) the function GetPageConfig(), which returns a record. All the fields in this return value can be used directly in the witty template.
Uncomment the function and change it to the following code:
UPDATE PUBLIC RECORD FUNCTION GetPageConfig()
{
  RETURN [ mainnav := this->GetMainNav()
         ];
}
The main navigation will show all folders with titles and published content from the root folder of the site. We can get a list of those folders by using a database SQL query on the table system.fs_objects. This table contains all files and folders within the publisher tree.
Within a webdesign object, there are three objects available that contain information about the currently rendered file:
To create the navigation, you have to access the database.
All files and folders can be retrieved from the ‘system’ database from the ‘fs_objects’ table. This can be accessed by loading:
LOADLIB "mod::system/lib/database.whlib";
For the main navigation we usually get all folders directly under the site main folder/siteroot with a title and a published indexfile.
The query for the main navigation will then look like this:
RECORD ARRAY FUNCTION GetMainNav()
{
  RETURN (SELECT *
               , isselected := this->targetobject->whfspath LIKE whfspath || "*"
            FROM system.fs_objects
           WHERE parent = this->targetsite->root // Items in site root
             AND link != ""      // With published indexfile
             AND title != ""     // Must have title
             AND isfolder        // Only folders
        ORDER BY ordering, ToUpperCase(title), name);
}
The result is a RECORD ARRAY with the navigation items in each RECORD.
After this you can use the results for the main navigation directly in the witty template by adding the navigation inside the htmlbody component like:
<header>
  <nav id="mainnav">
    <a href="[siteroot]" [if ishomepage]class="active"[/if]>Home</a>
    [forevery mainnav]
      <a href="[link]" [if isselected]class="active"[/if]>[title]</a>
    [/forevery]
  </nav>
</header>
‘[FOREVERY][/FOREVERY]’ iterates through the array with the navigation items.
Within the forevery loop you can use, besides the fields set within the navigation record, condition checks like : ‘[IF FIRST][/IF]’, ‘[IF LAST][/IF]’, ‘[IF ODD][/IF]’.
Or combinations like: ‘[IF NOT ODD][/IF]’, [IF ODD][ELSE][/IF]
To see the navigation working, make sure you have to add a published “Rich Text Document” file to the site root. Then, add one or more folders (with title!), and also add published “Rich Text Document” files to those folders. Make sure these documents are marked as index of the folder (because the link to a folder is actually the link to its index file, but only if that file is published).
Subnavigation
Next, subnavigation is added, which will contain a list of all documents and folders in the current folder.
First, alter the pageconfig return record to:
RETURN [ mainnav := this->GetMainNav()
       , subnav  := this->GetSubNav(this->targetfolder->id)
       ];
And after the GetMainNav, add the following function:
RECORD ARRAY FUNCTION GetSubNav( INTEGER folderid )
{
  RETURN (SELECT *
               , isselected := this->targetobject->whfspath LIKE whfspath || "*"
            FROM system.fs_objects
           WHERE parent = folderid // Items in current folder
             AND link != ""        // Published pages
             AND title != ""       // Must have title
             AND id != this->targetfolder->indexdoc //Ignore indexfile of current folder
             AND (parent != this->targetsite->root OR NOT isfolder) //ignore folders in siteroot
        ORDER BY ordering, ToUpperCase(title), name);
}
Also, add the following to the witty template inside the htmlbody component:
<aside>
  [if subnav]
    <nav id=”subnav”>
      [forevery subnav]
        <a href=”[link]” [if isselected]class=”active”[/if]>[title]</a>
      [/forevery]
    </nav>
  [/if]
</aside>
Adding path/crumbtrail.
To add path navigation for current active page, alter the pageconfig return record to:
RETURN [ mainnav := this->GetMainNav()
       , subnav  := this->GetSubNav(this->targetfolder->id)
       , pathnav := this->GetPathNav()
       ];
Add at top of the file
LOADLIB "mod::publisher/lib/publisher.whlib";
The publisher.whlib library is needed for the function GetFolderTreeIds() used for getting the actual path.
And after the pageconfig the getpathnav function:
  RECORD ARRAY FUNCTION GetPathNav()
  {
    //Get all ids from site root until current folder
    // First item is the site root, last the current folder id
    INTEGER ARRAY foldertree_ids := GetFolderTreeIDs(this->targetfolder->id);

    RECORD ARRAY pathnav := SELECT *, title := title ?? name
                              FROM system.fs_objects
                             WHERE id IN foldertree_ids
                               AND link != ""  // only with published index
                               AND isfolder
                          ORDER BY SearchElement(foldertree_ids, id); //Keep order set in foldertree_ids

    IF( Length(pathnav) > 0 )
    {
      pathnav[0].title := "Home"; //Overwrite first title (home)

      //If current file is not the index, add current file to pathnav
      IF( this->targetobject->id != this->targetfolder->indexdoc AND this->targetfolder->id != this->targetobject->id /* 404 page folder/object id are same */)
      {
        INSERT [ link  := this->targetobject->link
               , title := this->targetobject->title ?? this->targetobject->name
               ] INTO pathnav AT END;
      }

      IF( Length(pathnav) = 1 )
        RETURN DEFAULT RECORD ARRAY;//If just one item (home), then don't show pathnav
    }

    RETURN pathnav;
  }
And add the following code to the witty in the htmlbody component:
[if pathnav]
  <ol id="pathnav">
    [forevery pathnav]
      <li><a href="[link]">[title]</a></li>
    [/forevery]
  </ol>
[/if]
For styling the navigation you need to edit the scss file (<webdesignname>.scss).
Basic forms
If you want to add a contact form to the site, you can create a new file of type ‘Form’. You can style the form by altering the content of /shared/forms/forms.scss. The full form layout, with all basic fields, can be tested by selecting a file in your website in the Publisher and then using the ‘Open forms test’ in the menu under option ‘Tools’.
Simple widgets in the RTD with only HTML and Javascript
You can add simple components to the RTD by adding additional rules to the webdesign siteprofile and components to a Witty file.
For example if you want to offer a ‘weather’ widget (using https://weatherwidget.io/) option inside the RTD:
- Create folder
widgets/weather/inside the webdesign - In this folder, add the file
weather.siteprl.xmlwith the following content:
<?xml version="1.0" encoding="UTF-8" ?>
<siteprofile xmlns="http://www.webhare.net/xmlns/publisher/siteprofile">
  <widgettype namespace="http://yourdomainname/xmlns/widgets/weather"
              title="Weather"
              wittycomponent="weather.witty:weather">
  </widgettype>
</siteprofile>
- Also add the file “weather.witty” with the following content:
[rawcomponent weather]
<div class="widget widget-weather">
    <a class="weatherwidget-io" href="https://forecast7.com/en/52d226d89/enschede/" data-label_1="ENSCHEDE" data-label_2="WEATHER" data-theme="original" >ENSCHEDE WEATHER</a>
    <script>
      !function(d,s,id){var js,fjs=d.getElementsByTagName(s)[0];if(!d.getElementById(id)){js=d.createElement(s);js.id=id;js.src='https://weatherwidget.io/js/widget.min.js';fjs.parentNode.insertBefore(js,fjs);}}(document,'script','weatherwidget-io-js');
    </script>
  </div>
[/rawcomponent]
By using ‘rawcomponent’ the content of this component will not be altered or interpreted while rendered.
- Add to the main siteprofile (
<webdesignname>.siteprl.xml) directly after the existing applysiteprofile rule:
<applysiteprofile path="widgets/weather/weather.siteprl.xml" />
- Add to RTD siteprofile definition (
/shared/rtd/rtd.siteprl.xml) inside the <widgets /> element:
<allowtype type="http://yourdomainname/xmlns/widgets/weather" />
- Go to the publisher and create a new RTD file in your website. Edit this file by double clicking. You can add the weather widget using the “insert object” button:

- Publish the file. After publishing the widget is displayed in the page.
Add extra properties to files or folders
You can add extra properties to a file or folder by adding rules to the siteprofile. The data for these properties will be stored in a contenttype.
For example adding an SEO title option which overrides the title in html head element.
Add the following code to the end of the siteprofile (but before any <applysiteprofile> tag):
  <contenttype namespace="http://yourdomainname/xmlns/page" cloneoncopy="true">
    <member type="string" name="seotitle" />
  </contenttype>

  <tabsextension xmlns="http://www.webhare.net/xmlns/tollium/screens"
                 name="pagesettings"
                 implementation="none"
                 >
    <insert position="title" where="after">
      <textedit composition="contentdata" cellname="seotitle" width="1pr" title="SEO title" />
    </insert>
  </tabsextension>

  <apply>
    <to type="file" />
    <extendproperties extension=".pagesettings" contenttype="http://yourdomainname/xmlns/page" />
  </apply>
The contenttype defines the structure of the storage for the new property. The tabextension describes the extensions to the Publisher properties screen that are used to edit the property values. And the apply node describes that the property screens are only displayed for files (not for folders).
After adding this part to the siteprofile you have an extra field ‘SEO title’ in the file properties just after the title field. To use this field in the template, you have to add some Harescript to the GetPageConfig function.
You can use this->pagetitle to alter the page title in the title tag in the head-element. The default title is the title of the current file if set, otherwise it’s the folder title or name if folder title is not set.
To change the page title add the following code add the beginning of the GetPageConfig function:
// Get the contents of the contenttype with the extra properties
RECORD pagesettings := this->targetobject->GetInstanceData("http://yourdomainname/xmlns/page");

// Use the seotitle as page title if set
IF (pagesettings.seotitle != "")
  this->pagetitle := pagesettings.seotitle;
ELSE
{
  // Otherwise, format the title as (pagetitle - sitetitle)
  this->pagetitle := this->siteconfig.sitetitle;
  IF (this->targetobject->title != "")
  {
    // If page has a title, add this before site title
    this->pagetitle := this->targetobject->title || " - " || this->pagetitle;
  }
  ELSE IF (this->targetfolder->id != this->targetsite->root AND this->targetfolder->title != "")
  {
    //Use folder title if not siteroot and no pagetitle is set
    this->pagetitle := this->targetfolder->title || " - " || this->pagetitle;
  }
}
Adding a news folder with news items
To add a news folder, in which every news item has an associated publication date, the following steps can be taken:
First, add a new custom ‘news’ folder type to the siteprofile:
<!-- News folder -->
<contenttype namespace="http://yourdomainname/xmlns/folders/news" cloneoncopy="true" />
<foldertype typedef="http://yourdomainname/xmlns/folders/news"
            title="News"
            tolliumicon="tollium:folders/news" />

<!-- allow creation of news folders in every folder in the site -->
<apply>
  <to type="folder" />
  <allowfoldertype typedef="http://yourdomainname/xmlns/folders/news" />
</apply>
To add the storage and property screen extensions for the publication date, modify the “page” contenttype in the siteprofile to the following:
<contenttype namespace="http://yourdomainname/xmlns/page" cloneoncopy="true">
  <member type="string" name="seotitle" />
  <member type="datetime" name="date" />
</contenttype>
And add the following code for the property screen extensions:
<tabsextension xmlns="http://www.webhare.net/xmlns/tollium/screens"
               name="newspagesettings"
               implementation="none"
               >
  <insert position="description" where="after">
    <datetime composition="contentdata" cellname="date" required="true" title="Date" type="date" />
  </insert>
</tabsextension>
<apply>
  <and>
    <to type="file" parenttype="http://yourdomainname/xmlns/folders/news" />
    <not><to type="index" /></not>
  </and>
  <extendproperties extension=".newspagesettings" contenttype="http://yourdomainname/xmlns/page" />
</apply>
You can now create a news type folder and every file (except the index) in this folder has an extra date field just after the description field in the file properties.
To display the date in the template add
LOADLIB "wh::datetime.whlib";
At the top of the Harescript library [webdesignname].whlib so you can use the date formatting function.
Then add the date to the pageconfig function return value. The FormatDateTime function is used to present the date in a readable format.
RETURN [ mainnav := this->GetMainNav()
       , subnav  := this->GetSubNav(this->targetfolder->id)
       , pathnav := this->GetPathNav()
       , date    := FormatDateTime("%d %B %Y",pagesettings.date, this->languagecode ) //Page date ‘day monthname year’ (empty if not set)
       ];
After this you can add next line to the witty template
[if date]<div class="pagedate">[date]</div>[/if]
Adding headerimage to page
If you want a pageimage for every page, you need to add the following.
Change xml for the page contenttype properties to:
<contenttype namespace="http://yourdomainname/xmlns/page" cloneoncopy="true">
  <member type="string" name="seotitle" />
  <member type="datetime" name="date" />
  <member type="file" name="headerimage" />
</contenttype>
Then add to tabextention named ‘pagesettings’
<newtab title="Header image">
  <imgedit composition="contentdata"
           cellname="headerimage"
           width="1pr"
           height="350px"
           title="Header image"
           allowedactions="all refpoint" />
</newtab>
You should now see an extra tab ‘Header image’ in the properties of every file in the site.
To display the header image in the website first add
LOADLIB "mod::system/lib/cache.whlib";
at the top of the harescript library `[webdesignname].whlib` so you can use the image cache and resize function WrapCachedImage.
Now you can add
, headerimage := WrapCachedImage( pagesettings.headerimage,
      [ method    := "fill"
      , setwidth  := 2048
      , setheight := 350
      ])
inside the pageconfig return record.
In the witty template you change the header element to
<header>
  [if headerimage]
    <img class="headerimage" src="[link]" alt=""/>
  [/if]
  <nav id=”mainnav”>
    [forevery mainnav]
      <a href=”[link]” [if isselected]class=”active”[/if]>[title]</a>
    [/forevery]
  </nav>
</header>
and add the additional appropriate css styling to [webdesignname].scss
Add extra properties to site
You can add extra properties to the site folder by adding rules to the siteprofile xml
For example adding custom selectable footer navigation.
Add following to the siteprofile:
  <contenttype namespace="http://yourdomainname/xmlns/site">
    <member type="array" name="footerlinks">
      <member type="string" name="title" />
      <member type="intextlink" name="link" />
    </member>
  </contenttype>

  <tabsextension xmlns="http://www.webhare.net/xmlns/tollium/screens"
                 name="sitesettings"
                 implementation="none"
                 >
    <newtab title="Footer">
      <heading title="Footer links" />
      <arrayedit rowselect="true"
                 composition="contentdata"
                 cellname="footerlinks"
                 roweditscreen=".editfooterlinks"
                 width="1pr"
                 height="1pr"
                 orderable="true">
        <column name="title" title="Title"  type="text" width="1pr" />
        <p:intextlinkcolumn name="link" title="Link" width="2pr" />
      </arrayedit>
    </newtab>
  </tabsextension>
  <apply>
    <to type="folder" pathmask="/" />
    <extendproperties extension=".sitesettings" contenttype="http://yourdomainname/xmlns/site" />
  </apply>

  <screen name="editfooterlinks"
          title="Edit link"
          implementation="rowedit"
          minwidth="350px"
          xmlns="http://www.webhare.net/xmlns/tollium/screens">
    <compositions>
      <record name="row" />
    </compositions>
    <body>
      <textedit composition="row" cellname="title" title="Title" required="true" width="1pr" />
      <p:intextlink composition="row" cellname="link" title="Link" required="true" />
    </body>
    <footer>
      <defaultformbuttons buttons="ok cancel" />
    </footer>
  </screen>
And add at top namespace for components ‘xmlns:p’ to the siteprofile
<siteprofile xmlns="http://www.webhare.net/xmlns/publisher/siteprofile"
             xmlns:m="http://www.webhare.net/xmlns/system/moduledefinition"
             xmlns:p="http://www.webhare.net/xmlns/publisher/components">
After this you see an extra tab ‘Footer’ in the properties of the site folder where you can add links for the footer.
To display the footer links in the template first add
LOADLIB "mod::publisher/lib/publisher.whlib";
in top of the harescript library [webdesignname].whlib so you can use the function GetIntextLinkTarget for link resolving.
Then add to the pageconfig function:
RECORD sitesettings := this->targetsite->rootobject->GetInstanceData("http://yourdomainname/xmlns/site");
And add in the return record of the pageconfig function:
, footernav := (SELECT title, link := GetIntextLinkTarget(link) FROM sitesettings.footerlinks)
Now you can use footernav in the witty template like:
<footer>
  [if footernav]
    <nav id="footernav">
      [forevery footernav]
        <a href="[link]">[title]</a>
      [/forevery]
    </nav>
  [/if]
</footer>
Adding custom widgets with extra properties in RTD
Adding a custom widget in the RTD with extra properties like a two columns widget
Create folder widgets/twocolumns/
To this folder, add file: twocolumns.siteprl.xml with the following content:
<?xml version="1.0" encoding="UTF-8" ?>
<siteprofile xmlns="http://www.webhare.net/xmlns/publisher/siteprofile">
<widgettype namespace="http://yourdomainname/xmlns/widgets/twocolumns"
              title="Two columns"
              editfragment=".edittwocolumns"
              renderlibrary="twocolumns.whlib"
              renderobjectname="EmbedTwoColumns"
              wittycomponent="twocolumns.witty:twocolumns"
              >
    <members>
      <member name="left" type="richdocument" />
      <member name="right" type="richdocument" />
    </members>
  </widgettype>

  <fragment name="edittwocolumns"
            xmlns="http://www.webhare.net/xmlns/tollium/screens"
            implementation="none">
    <contents>
      <grid>
        <col width="1pr" />
        <col width="1pr" />
        <row>
          <cell height="1pr">
            <richdocument cellname="left"
                          composition="contentdata"
                          errorlabeltid=".left"
                          required="true"
                          width="400px"
                          height="1pr"
                          minheight="330px"
                          />
          </cell>
          <cell height="1pr">
            <richdocument cellname="right"
                          composition="contentdata"
                          errorlabeltid=".right"
                          required="true"
                          width="400px"
                          height="1pr"
                          minheight="330px"
                          />
          </cell>
        </row>
      </grid>
    </contents>
  </fragment>

</siteprofile>
Create file twocolumns.witty with content:
[component twocolumns]
  <div class="widget-twocolumns">
    <div class="col">
      [left]
    </div>
    <div class="col">
      [right]
    </div>
  </div>
[/component]
Create file twocolumns.whlib with content:
<?wh
LOADLIB "mod::publisher/lib/widgets.whlib";

PUBLIC OBJECTTYPE EmbedTwoColumns EXTEND WidgetBase
<
  MACRO PTR left;
  MACRO PTR right;

  MACRO NEW()
  { //Pointer for RTD rendering always before Render function
    this->left := PTR this->context->OpenRTD(this->data.left)->RenderAllObjects;
    this->right := PTR this->context->OpenRTD(this->data.right)->RenderAllObjects;
  }

  UPDATE PUBLIC MACRO Render()
  {
      this->EmbedComponent([ left  := this->left
                           , right := this->right
                           ]);
  }
>;
Add to the main siteprofile ( <webdesignname>.siteprl.xml ) directly after the existing applysiteprofile rule:
<applysiteprofile path="widgets/twocolumns/twocolumns.siteprl.xml" />
For styling add file twocolumns.css to the folder with:
.widget-twocolumns
{
  display: flex;
}
.widget-twocolumns > .col
{
  flex: 0 1 50%;
  max-width: 50%;
  padding-right: 15px;
}
.widget-twocolumns > .col + .col
{
  padding-left: 15px;
  padding-right: 0;
}
@media(max-width: 600px)
{
  .widget-twocolumns
  {
    display: block;
  }
  .widget-twocolumns > .col
  {
    padding-right: 0;
  }
  .widget-twocolumns > .col + .col
  {
    padding-left: 0;
  }
}
Note: Use .css file when you want to use the styling in RTD-editor because editor preview does not handle .scss files
Add to main scss file definition <webdesignname>.scss
@import "./widgets/twocolumns/twocolumns.css";
Add to RTD siteprofile definition (/shared/rtd/rtd.siteprl.xml)
after ‘<css path="rtd.css" />’:
<css path="../../widgets/twocolumns/twocolumns.css" />
(This is used by the RTD-editor to preview the widget)
and inside the <widgets /> element:
<allowtype type="http://yourdomainname/xmlns/widgets/twocolumns" />